Home Made Standing Desk Raspberry Pi Controller
One of my lockdown projects was to make my sit/stand controller smart. I used a Raspberry Pi to create a custom controller that could control the motor on my desk and allow me to rise and lower it over the network as well as via a touch-interface.

I have a Conset 501-49 sit/stand desk at home. It's a decent, solid work desk but the default controller that it came with is poor, only allowing you to raise and lower via a set of small push-buttons. This makes it tedious to find the correct height and means you usually just don't bother getting up and standing, making it a rather expensive sit-only-desk.
Over the lockdown, I decided to improve this by replacing the original buttons with a Raspberry Pi powered controller that would allow me to raise and lower my desk at the click of a single button.
Here's a closer look at it sitting under my desk:
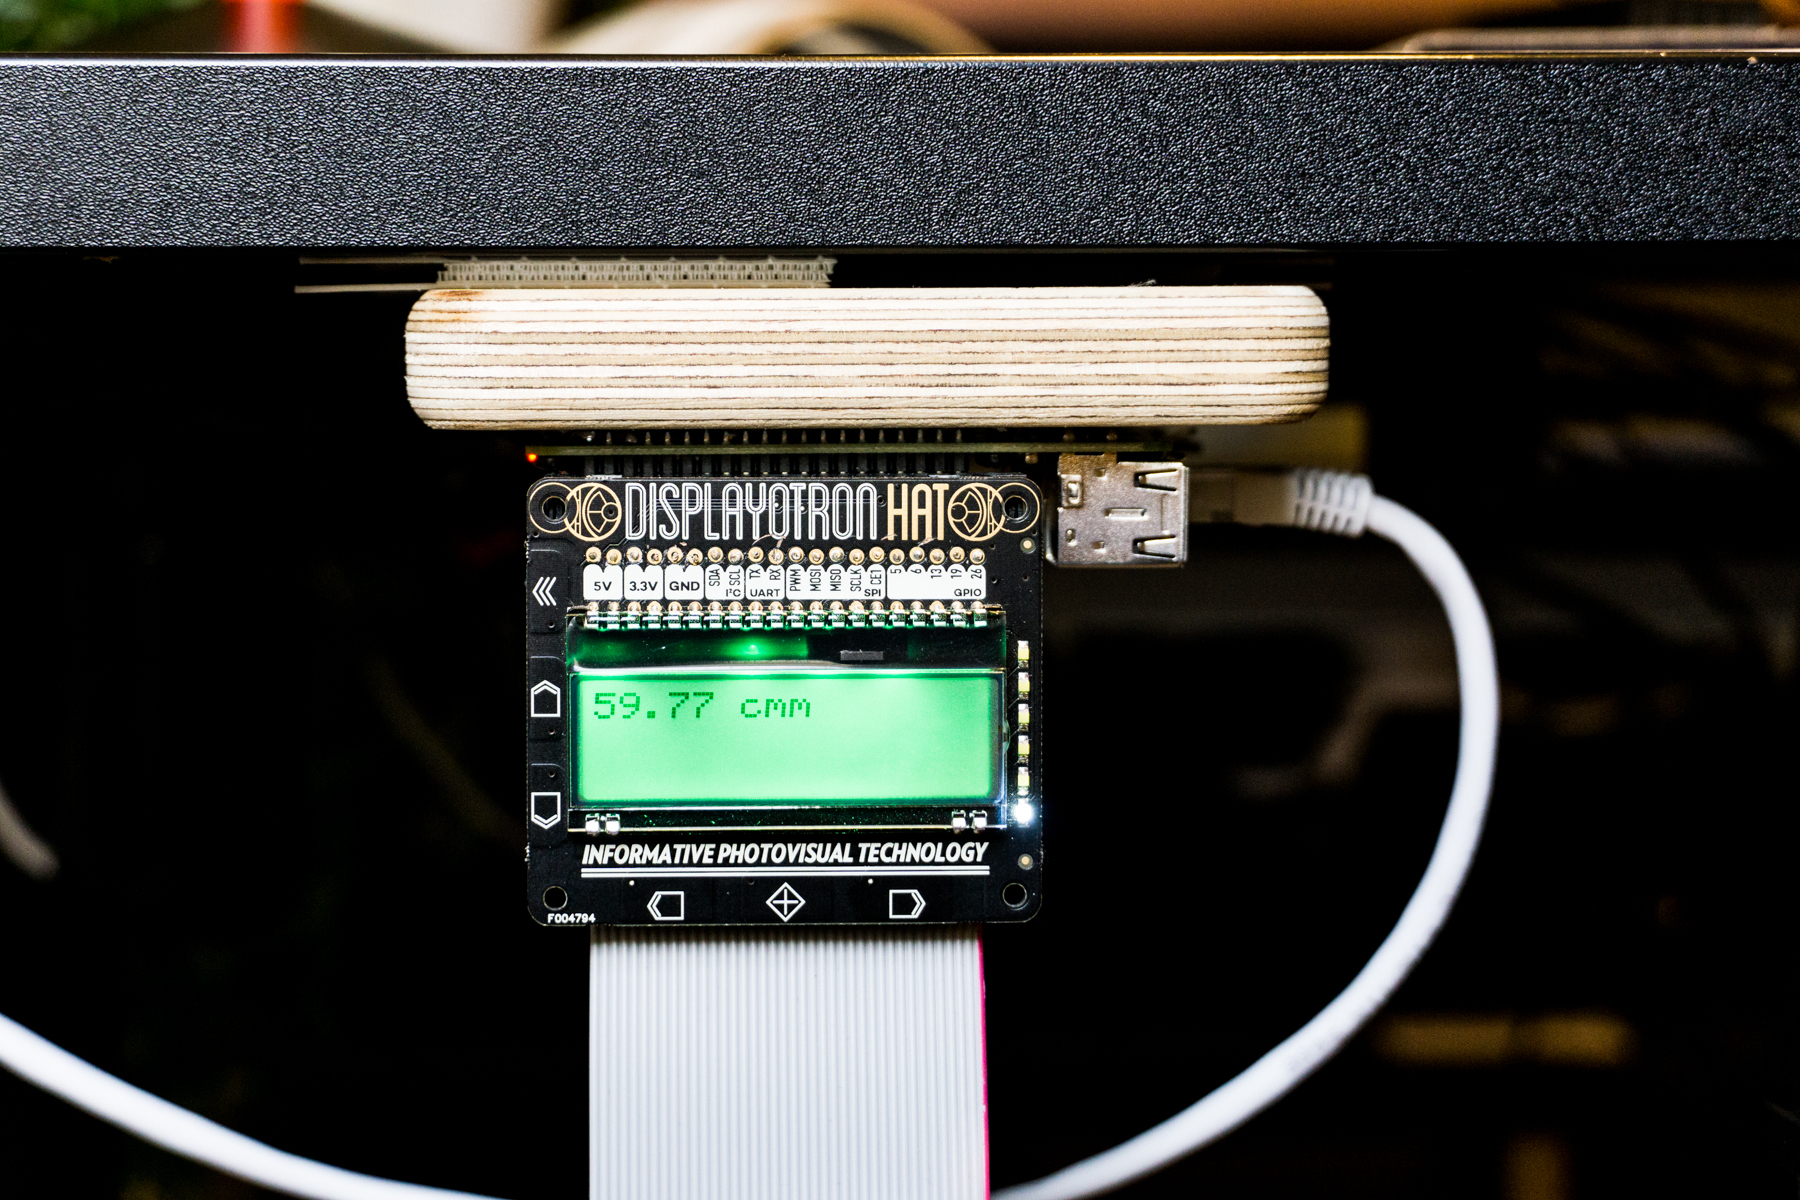
This is a DisplayOTron HAT that I bought from Pimoroni a few years ago and never had a proper use for. Thankfully this hat is perfect for this project.
- On the front is a LCD display that shows the current height from the ground. This could be reprogrammed to show anything: animations, time standing or sitting, last time the desk was raised or lowered etc.
- On the left of the display you'll see up/down capacitive buttons. These are programmed to allow me to manually raise or lower the desk, just like the original buttons.
- Along the bottom are the preset buttons. Hitting the left arrow lowers the desk to my pre-programmed "ground" setting where it's comfortable for me to sit (around 60cm off the ground) while right arrow button raises it to my preset standing position (120cm).
- Along the right there's a light-bar. This is really just a decoration, showing the current position of the desk. They light-up individually as the desk goes up. Like a 1-dimensional Christmas tree.
 Superglue, picture hooks and velcro sticky things
Underneath you'll see:
- Raspberry Pi B+ (already had this)
- Relay board (bought on PiHut).
- HC-SR04 height/distance sensor (bought from Pi Supply).
And here it is bouncing up and down:

So how does it work?
The relays on the Raspberry Pi allow us to control the underlying electrical circuit to raise/lower the desk via the RPIO's GPIO pins.
The height sensor detects how high the desk is currently off the ground and allows us to start/stop the motor via the above relays.
Finally, the display allows us to control everything as well as display the current height of the desk.
There were a few general stages to getting this working:
- Figuring out how the existing switches and motor work.
- Replacing the default physical switches with relays.
- Adding the height-sensor.
- Programming everything together.
Figuring it Out
Be Warned
I don't know what I'm doing, so a lot of this was just me poking an prodding at things while making sure I didn't electrocute myself. Be careful.
Here's what I knew: my desk had a big black motor sitting underneath. It raised and lowered the table. There were a few wires coming out of it connected to its build-in switch.
To learn more, the first thing I did was open (and effectively destroy) the default switch, to see how it worked inside
Top Tip: destroy things as early as possible so that you have to finish the project
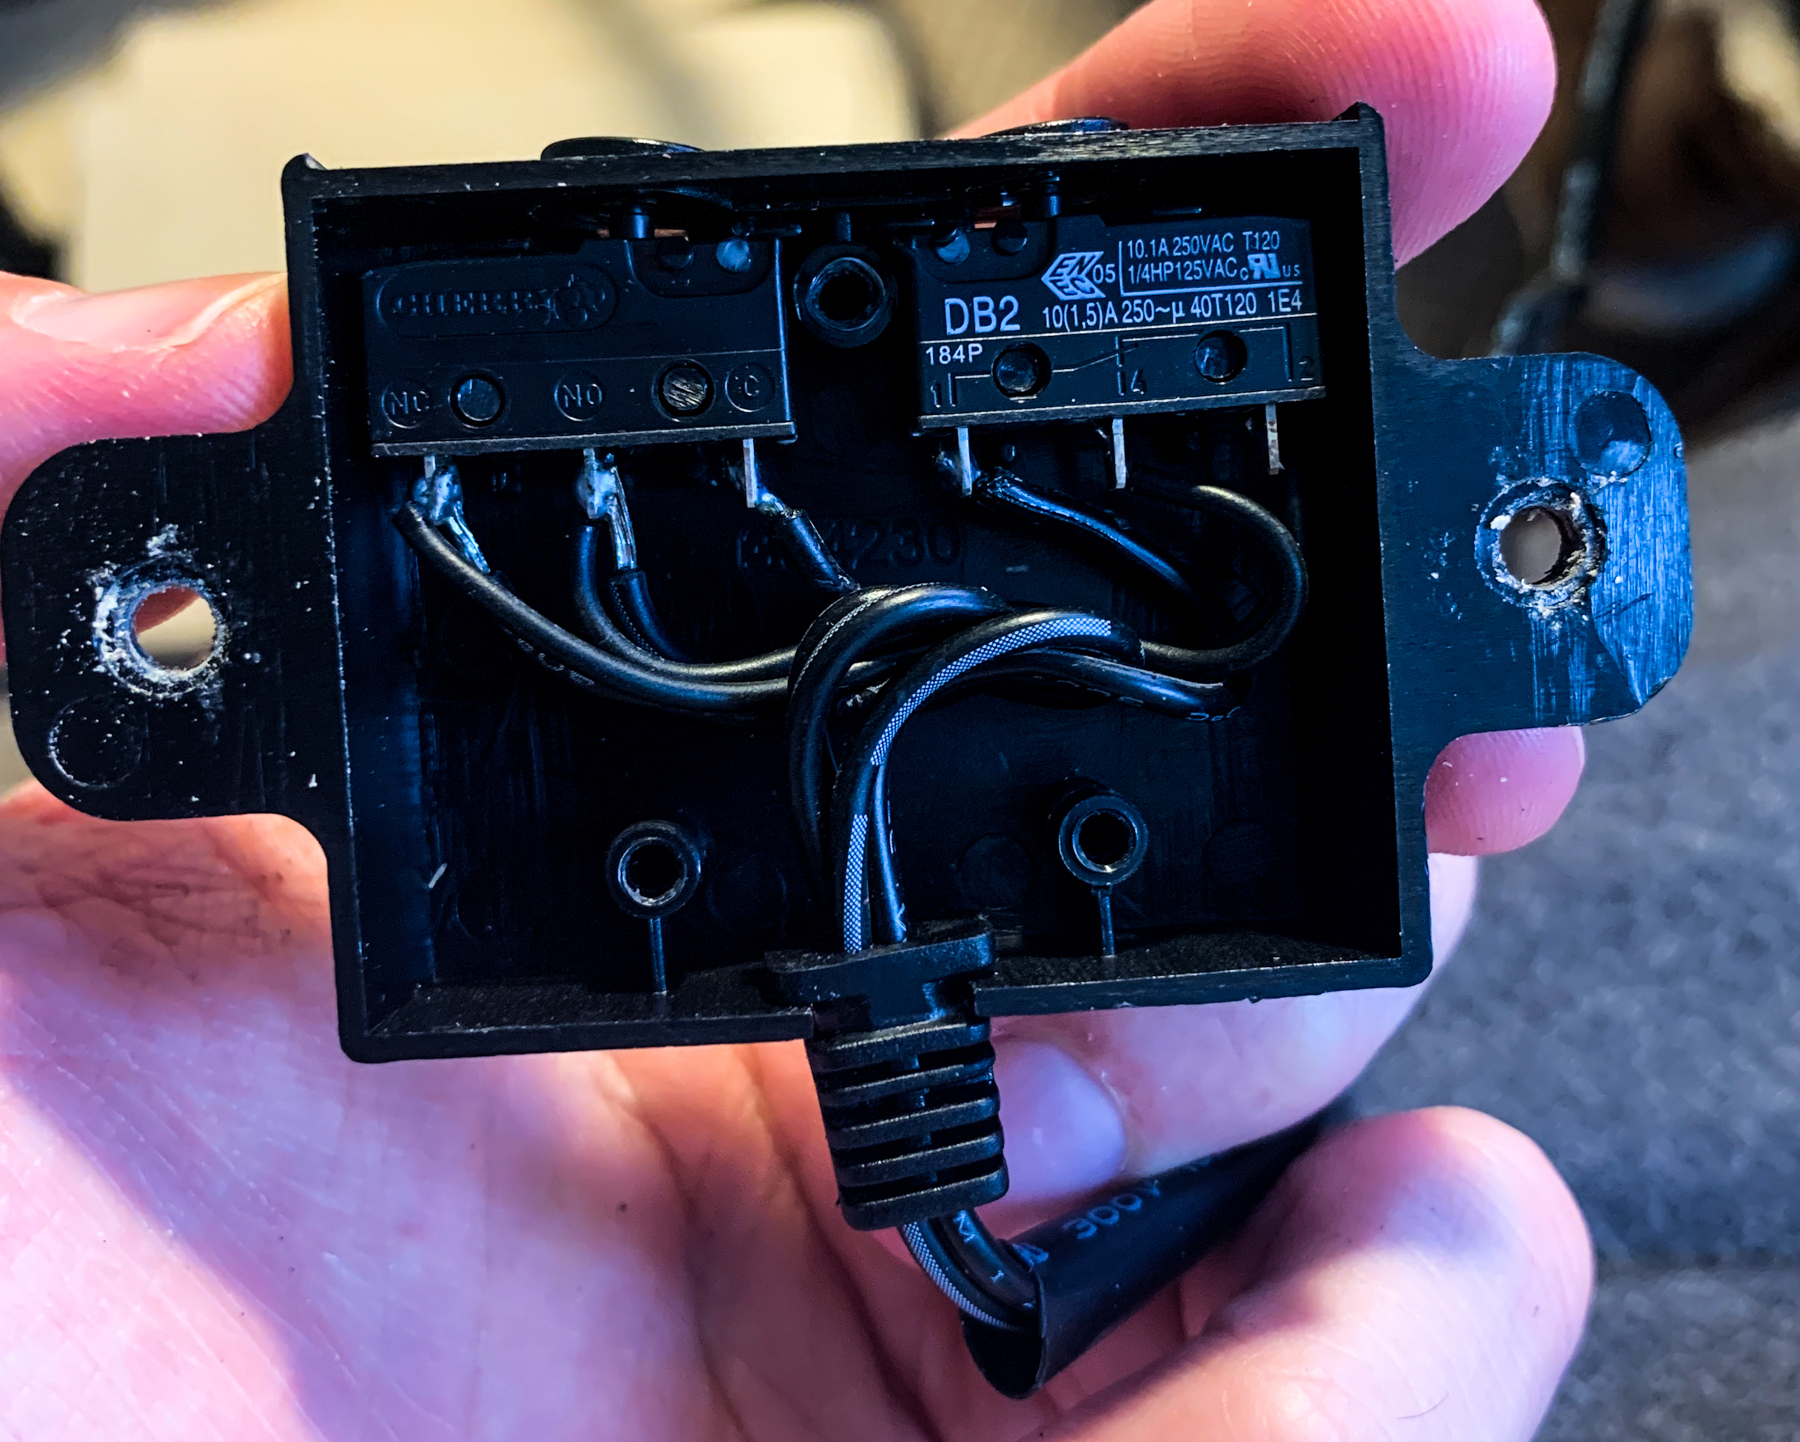
At a basic level it's easy to understand what these switches do: they control how electricity flows to the motor. The circuit is open by default with no electricity flowing. When you press a button, it closes the circuit allowing electricity to flow to the motor which will rise or fall. Which direction the motor runs depends on whether you connect live or neural [citation needed]
To be able to actually re-wire this though and hook everything up the relays, you need to actually understand it working in more detail. To do this, I cut the switches out (after taking a number of inadequate pictures) and created my own battery-powered circuit to see it in action.
 It's a mess, but this circuit actually mimics the desk. There are two leds on the breadboard. These lighting up represent the desk raising or lowering.
If I'm honest, I don't understand this stuff well enough to offer an explanation of exactly how you should do this or how it works in any detail. I did map it all out myself:
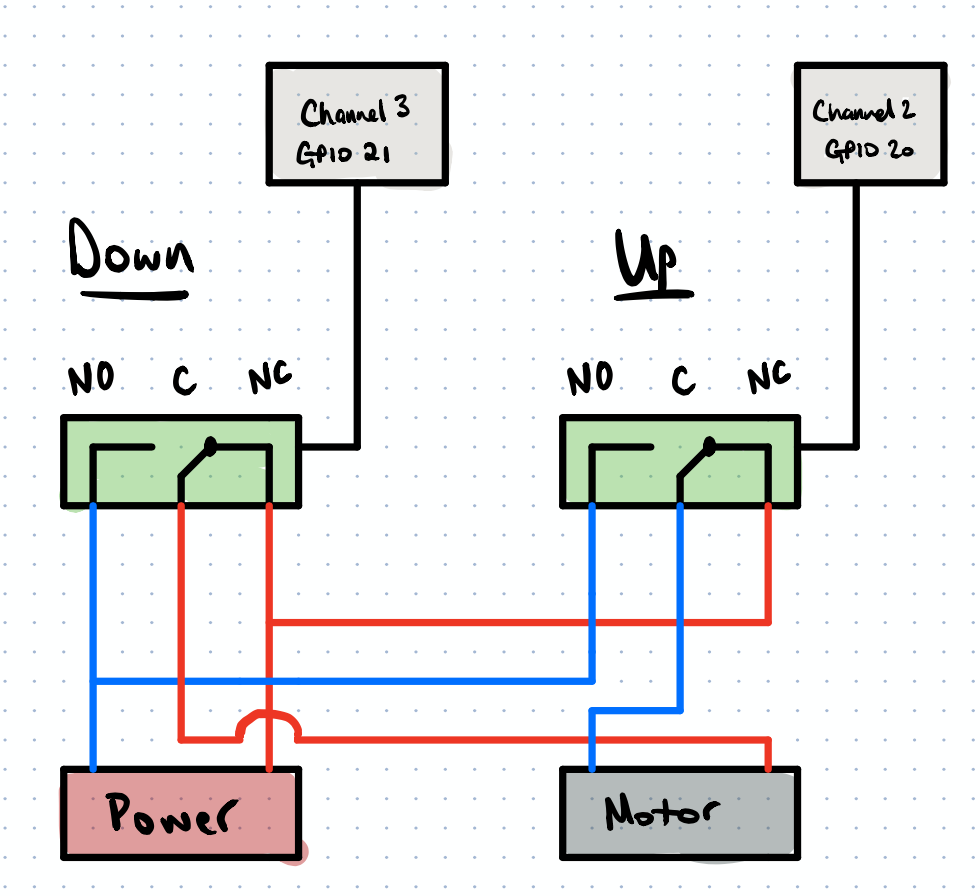
But this might be wrong as I did a lot of reconnecting-wires-until-it-worked, so if you're doing something similar, spend some time researching relays and playing with a test circuit yourself before working with anything connected to the mains.
Adding the Relays
With a better idea of how the switches worked, I was able to add the relay board to the Raspberry Pi and test out the circuit before actually hooking it up to the motor.
 Here 'red' means the desk is rising, 'green' means the desk is lowering ... or the other way around, I can't remember
Finally, with that working, I went on to wire the actual motor up to the Raspberry Pi. Again, this is potentially dangerous. If you're doing this make sure you read-up on it and take some precautions (like cowering in the corner while you flip the switch with a long stick).

With everything wired up correctly I could now control both an "up" relay and "down" relay via code.
Height Sensors
With the ability to raise and lower the desk via the relays (and code), I needed to think about how to actually control the desk and get it into a comfortable standing or sitting position automatically.
One easy approach is to simply raise or lower the desk for a certain amount of time. In other words, to get into the "standing" position just enable the "up" relay for 5 seconds. To go back to "sitting" enable the "down" relay for 5 seconds.
This doesn't really work though. The desk lowers much more quickly than it raises (due to gravity) so it's very hard to get the correct timings. Furthermore you can easily get out-of-sync, meaning you have to manually adjust the height again, making the whole endeavour pointless (of course I only realised this once I had assembled everything).
A better approach is to use a height sensor. These are small little devices that send out a sound wave and measure how long it takes to return. With some simple maths you have the height of the ground.
 The height sensor is the little E.T.-looking device in the top right.
I found a few tutorials on setting this up via a small circuit on the breadboard. With some experimentation it was easy to start reading the desk height via Python.
The Code
With all the hardware in place, the final thing was to tie everything together with some Python.
Check out the code
You can have a closer look at the code over on my Github page
I don't have much experience programming hardware or embedded devices so I had to tinker with this to get it working.
I ended up using Redis to create a message queue that each part of the controller could communicate through and then using threads to handle most of the various parts of the controller:
Bonus: Apple Home via Homebridge
As an added bonus I also installed Homebridge on the Raspberry Pi, allowing me to control the standing desk via my iPhone/Mac/iPad.

To do this I needed to create a plugin for homebridge. You can also see the code for this on my Github page. I don't actually use this that much to control the desk, but it's a nice added bonus.